I’ve been playing around with TinyBASIC Arduino Nano tonight and hooked up a blue LED and had it flash.
10 FOR A=0 TO 10
20 DWRITE 13, HIGH
30 DELAY 250
40 DWRITE 13, LOW
50 DELAY 250
60 NEXT A
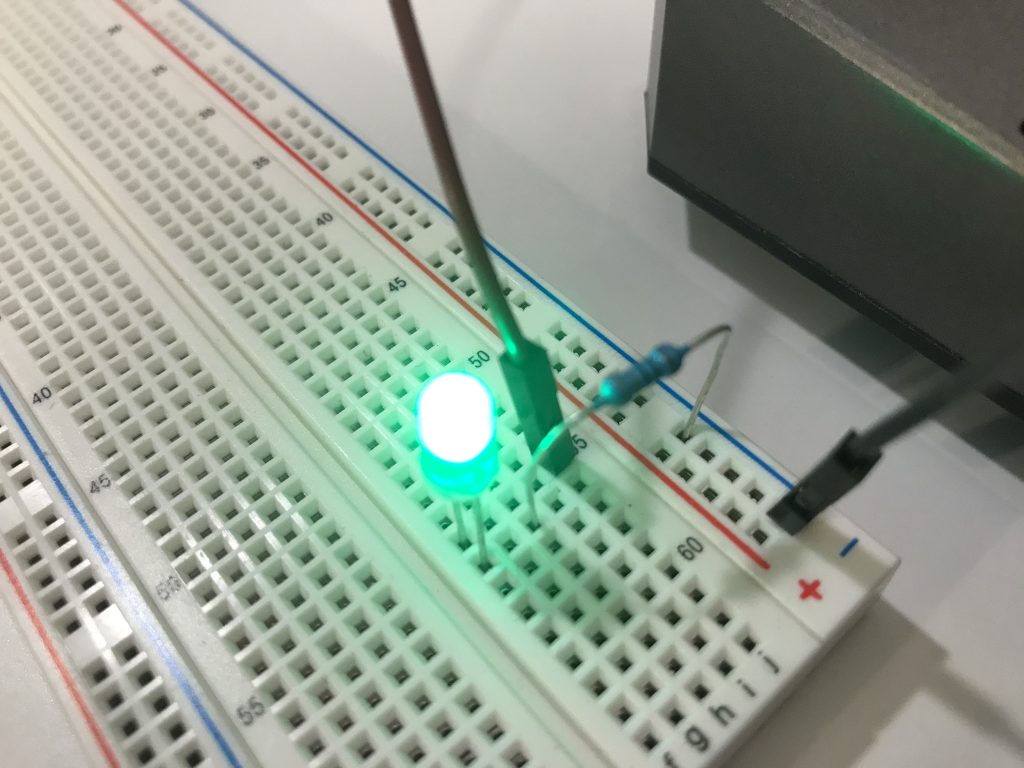
Parts:
1 x 330 resistor
1 x LED
2 x connecting wires
D13 is connected to 330 resistor to positive LED and negative to GND.Also saved it to EEProm on chip using ESAVE command so that it stored when I turn off and on again.
I’ve had this item on my to do list since 1991 and at the time I got hold of some great books on the topic and sketched out some basic designs I never found the time to design/build my very own Single Board Computer (SBC).
At the time I wanted to build either a 6502 or Z80 SBC and even learnt some Z80 assembly (already had 6502 under control) in the event I got to the build part.
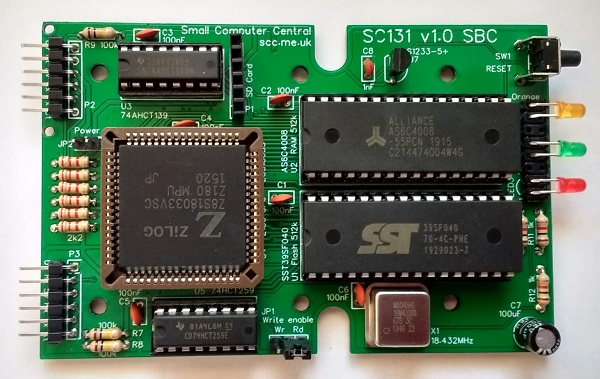
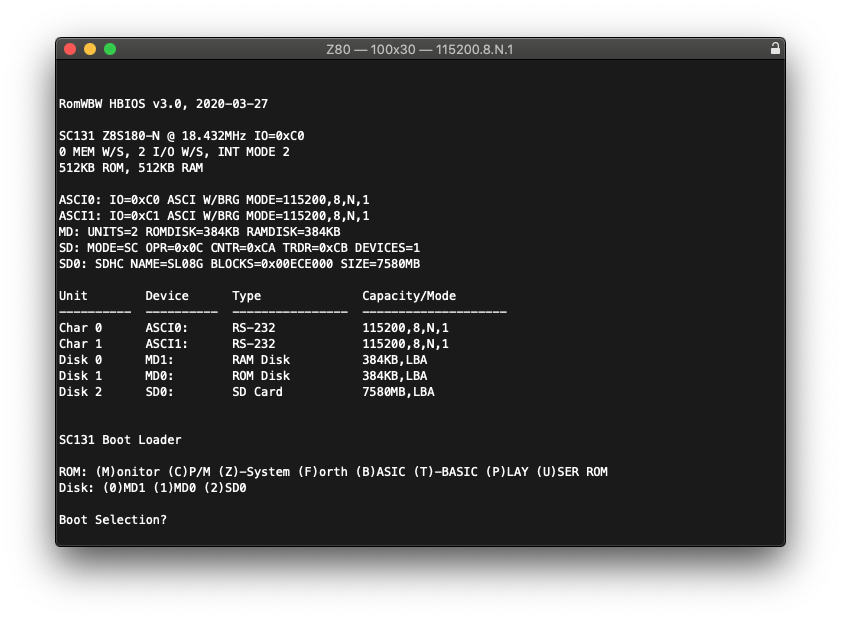
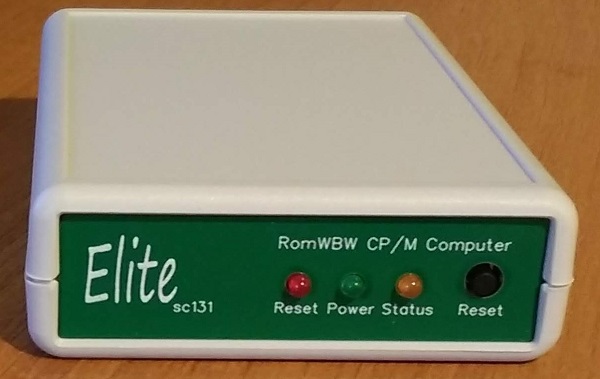
A few months ago I built the MyZ80 (also known as RC2014 mini) SBC and had such a fun time I thought I build another… This time around I order the Elite SC131 from Small Computer Central.
The design is compact and when fitted in the Elite case sits beautifully on my desk next to my Mac Mini. A few features of the SC131 is that it comes complete with CPM 2.2 installed in ROM, along with MBASIC, TBASIC and Forth.
Features: * Z180 CPU * 512K RAM * 512K ROM (RomWBW installed) * Duel serial ports * SD Card storage
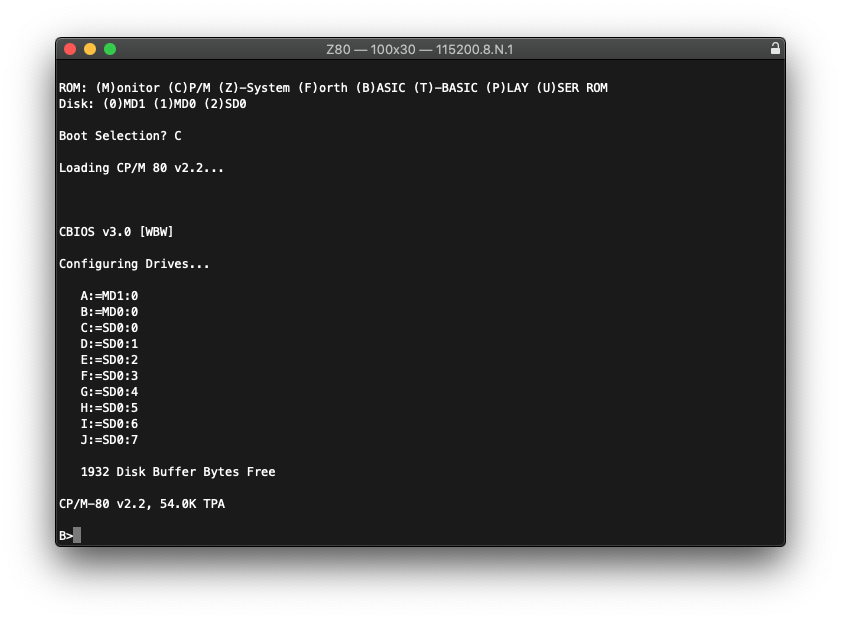
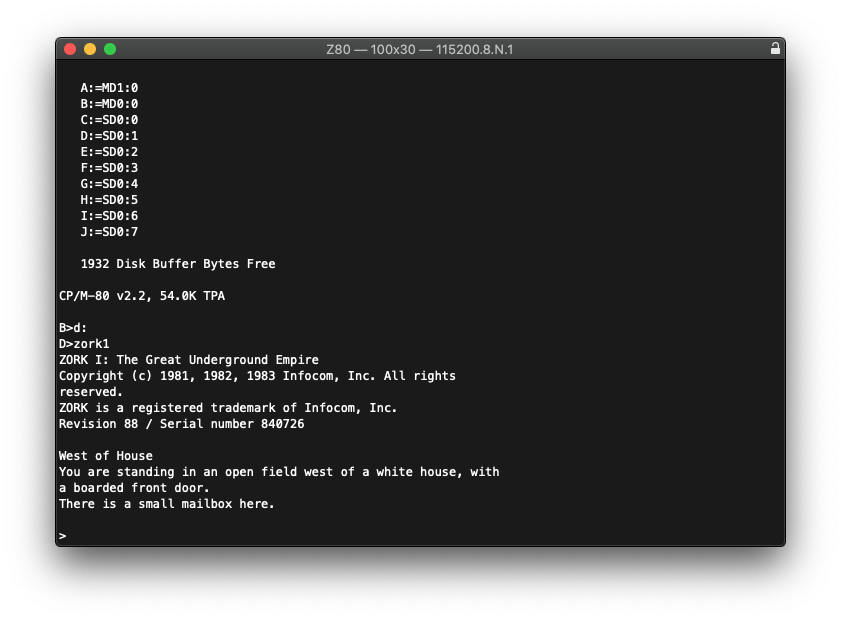
So I built the SC131 (easy to follow instructions) and had the whole computer up in under 2 hours. Booted CPM and configured the SD Card and installed a few classic Infocom text adventures to test that all was working fine, and before long I was ‘West of House’.
So where to from here?
Well I think I’ll dig deeper in the old world of CPM, something that I really haven’t used since 1986 on Kaypro and then very little on my Commodore C128 and write a few programs in BASIC, Forth, C and Assembler.
A couple of new Arduino Nano’s arrived in the mail today so decided what better time to build a modern retro computer about as powerful as a ZX80 Spectrum from 1980. Total cost about $40.
The Nano on the left runs the Tiny BASIC interpreter, audio out and PS2 keyboard control, and the Nano on the right takes care of the video output via a composite connection. However, the large font on a 40 inch TV is a bit overwhelming.
A total 999 bytes available for programming fun so I outputted some 8-bit sounds.
Not sure what to do next with this, but given the small amount of memory it will take sound planning.
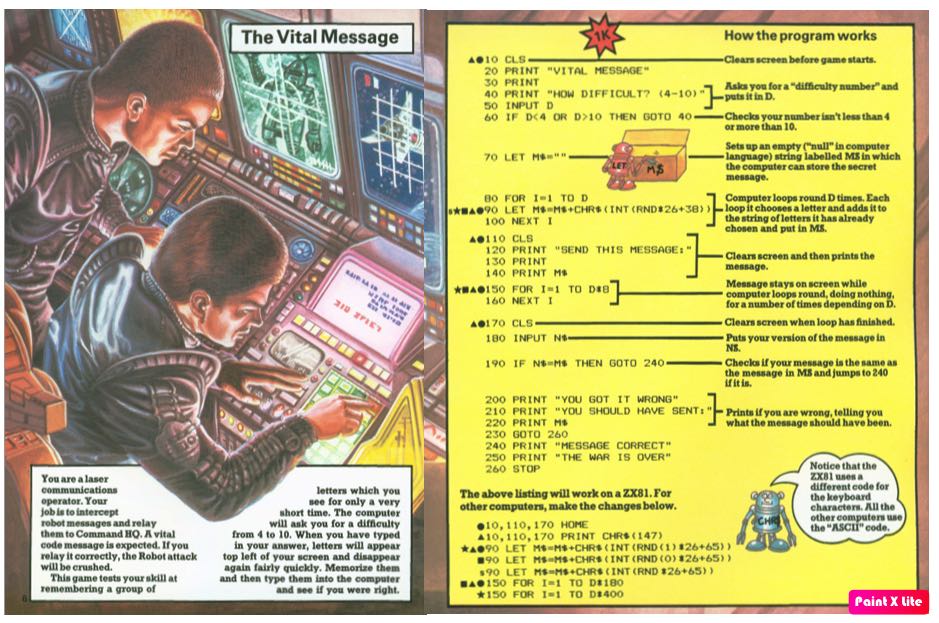
My second BASIC to C conversion using the classic Usborne 1980s computer books which helped many of today’s tech professionals were inspired by the Usborne computing books they read as children. The books included program listings for such iconic computers as the ZX Spectrum, the BBC Micro and the Commodore 64, and are still used in some computer clubs today.
Usborne books still continue to publish books on many topics including programming using modern languages but on their website they also allow the old classic books to be downloaded for free, so if you want to play around with them click here.
/*

The Vital Message

You are a laser communications operator. Your job is to intercept robot messages and relay them to Command HQ. A vitial code message is expected. If you relay it correctly, the Robot attack will be crushed.

This game tests your skill at remembering a group of letters which you see for only a very short time. The computer will ask you for a difficulty from 4 to 10. When you have typed in your answer, letters will appear top left of your screen and disappear again fairly quickly. memorise them and then type them into the computer and see if you were right.

Compiler information: gcc -o vitial vital.c

*/


#include <stdio.h>
#include <stdlib.h>
#include <time.h>
#include <ctype.h>
#include <string.h>

void exit(int status);

int main() {

    char robotCode[10] = "";
    char playerEntry[10] = "";
    int difficulty = 0;
    int iCounter = 0;
    time_t t;
    time_t start, end;

    system("clear");
    printf("Vital Message\n\n");
    printf("How difficult? (4 - 10) ?");
    scanf(" %d", &difficulty);

    if (( difficulty <= 4 ) && difficulty >= 10) {
        difficulty = 4;  // Set default 4 character message
    }

    while (iCounter < difficulty) {
        srand((unsigned) time(&t)+iCounter);
        robotCode[iCounter] = 65 + rand() % 26;
        iCounter++;
    }

    system("clear");
    printf("Send this message: ");
    printf(" %s\n\n", robotCode);

    time(&start);
    do time(&end); while(difftime(end, start) <=    difficulty/2);

    system("clear");
    printf("Enter the code: ");
    scanf(" %s", playerEntry);

     if (strcmp(robotCode, playerEntry) == 0)  {
        printf("Message correct\n");
        printf("The war is over\n\n");
        exit(0);
    } else {
    printf("You got it wrong\n");
    printf("You should have sent:\n\n");
    printf(" %s\n\n",robotCode);
    }

return 0;

}
Usborne 1980s computer books helped many of today’s tech professionals were inspired by the Usborne computing books they read as children. The books included program listings for such iconic computers as the ZX Spectrum, the BBC Micro and the Commodore 64, and are still used in some computer clubs today.
Each of these Usborne books had endless examples of BASIC programs, each to be typed in by the user and modified with simple step by step instructions.
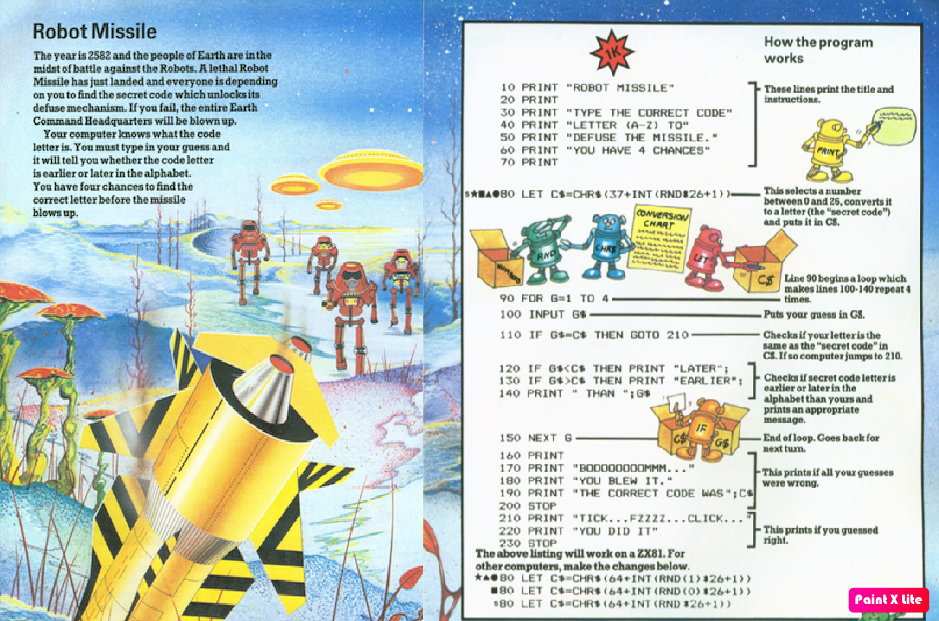
Robot Missile is a very simple code guessing game, where the player has 4 turns to guess the correct code to disarm the missile and win the game.
Here I’ve re-written the BASIC code into C, for no other reason than to so what it looks like written in C for a modern computer, including computers like the Raspberry Pi.
Usborne books still continue to publish books on many topics including programming using modern languages but on their website they also allow the old classic books to be downloaded for free, so if you want to play around with them click here.
/*

Robot Missile

The year is 2582 and the people of Earth are in the
midst of battle against the Robots. A lethal Robot
Missile has just landed and everyone is depending
on you to find the secret code which unlocks its
defuse mechanism. It you fail, the entire Earth
Command Headquarters will be blown up.

Your compute knows what the code letter is. You
must type in your guess and it will tell you whether
the code letter is earlier or later in the alphabet.
You have four chances to find the correct letter
before the missile blows up.

Compile: gcc -o robotm robotm.c

*/

#include <stdio.h>
#include <stdlib.h>
#include <time.h>
#include <ctype.h>

void exit(int status);

int main() {
    int n, i, x;
    char s;
    time_t t;

    i = 0;
    x = 0;
    n = 0;

    system("clear");
    printf("Robot Missile\n\n");
    printf("Type the correct code\n");
    printf("letter (A-Z) to defuse\n");
    printf("the missle.\n\n");
    printf("You have 4 chances\n");

    srand((unsigned) time(&t));
    n = 65 + rand() % 26;

    while (x < 4)  {
        printf("ENTER CODE: ");
        scanf(" %c", &s);

        i = toupper(s);

        if (i == n) {
            printf("TICK...FZZZZ...CLICK...\n");
            printf("YOU DID IT\n\n");
            exit(0);
        } else if (i < n) {
            printf("LATER ");
        } else if (i > n) {
            printf("EARLIER ");
        }
        printf("THAN %c\n\n",s);
        x++;
    }

    printf("BOOOOOOOOMMM...\n");
    printf("YOU BLEW IT.\n");
    printf("THE CORRECT CODE WAS %c\n\n",n);

    return 0;

}
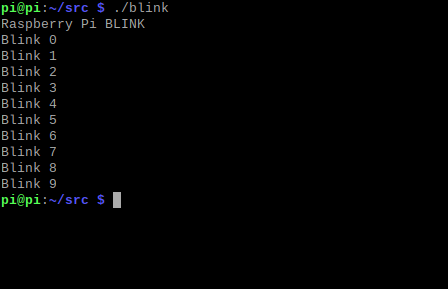
Raspberry Pi project #1, the blinking of an LED using C and the wiringPi library. I know this isn’t necessarily anything special but I wanted to record my little projects and what better place to start than by building a simple circuit and making a green LED blink on and off.
#include <stdio.h>
#include <wiringPi.h>

// Bulid: gcc -o blink blink.c -lwiringPi
// Use Broadcom numbering PIN 11 on Pi
#define LED 0

int main (void)
{
    printf("Raspberry Pi BLINK\n");

    wiringPiSetup ();
    pinMode (LED, OUTPUT);

    digitalWrite (LED, 0);

    int i;

    for (i = 0; i < 10; i++)
    {
        printf("Blink %d\n", i);
        digitalWrite (LED, 1);  // Turn ON LED
        delay (500);            // Wait half a second
        digitalWrite (LED, 0);  // Turn OFF LED
        delay (500);            // Wait half a second
    }

    return 0;
}
Posted inC, Programming|Comments Off on Blinking LED
Here is a simply C program that lets you enter a number from 1 -7 (valid options) or higher than 7 as an invalid entry. Using multiple if…else decisions the program will display a corresponding day of the week.
/*

Example 1.0 - Print the Day

Let us write a program that requests a number from 1 to
7 and prints the name of the day of the week. For    example, if the user enters 5, the program prints Thursday. Example 1.0 does the job using a series of if...else statements.

Compiler instructions:  gcc -o dow dow.c

*/


#include <stdio.h>
#include <stdlib.h>

int main() {
    int n;
    void printDay(int);
    system("clear");
    printf("Enter a day from 1 to 7: ");
    scanf("%d", &n);
    printDay(n);
} // End main

void printDay(int d) {
    if (d == 1)      printf("Sunday\n");
    else if (d == 2) printf("Monday\n");
    else if (d == 3) printf("Tuesday\n");
    else if (d == 4) printf("Wednesday\n");
    else if (d == 5) printf("Thursday\n");
    else if (d == 6) printf("Friday\n");
    else if (d == 7) printf("Saturday\n");
    else printf("Invalid day\n");
    printf("\n");
} // End printDay
Posted inC, Programming|Comments Off on Day of Week
Been about 25 years since I’ve written anything in x86 assembler so thought it might be fun to install NASAM and write a simple ‘Hello World’
org 0x0100	; Starting memory address for COM program
start:
	mov bx,message	; Read text stored message

repeat:
	mov al,[bx]	; Read next letter of message
	test al,al	; Compare text character
	je end		; If equal (0) then jump to end
	push bx
	mov ah,0x0e
	mov bx,0x000f
	int 0x10	; Call BIOS interrupt to display text
	pop bx
	inc bx
	jmp repeat	; Repeat, read next letter of message

end:
	int 0x20	; Exit application and return to DOS

message:
	db "Hello, world",0	; Text message to display
Been playing around with my Raspberry Pi 4 which I’ve installed in a great retro looking desktop case. Anyway I’ve never written anything in C for the Pi so though I’d have a go putting out the classic ‘Hello World’
To compile, I’ll assume you have already install a C compiler.

scott@raspberrypi ~/src/c $ gcc -o hello hello.c

Execute with ./hello

// Simple Hello World written in C for the Raspberry Pi

#include <stdio.h>

main () {

        printf("Hello World\n");

}
Posted inC, Programming|Comments Off on Hello World ‘C’
Early in September 2019 while on holidays in London I had a couple of free days available and decided to head north to Cambridge to visit the Centre for Computing History which was having an event day.
Hidden away in an industrial estate this unassuming warehouse with a faded beige roof soon had an overflowing car park and a growing crowd all waiting for the doors to open.
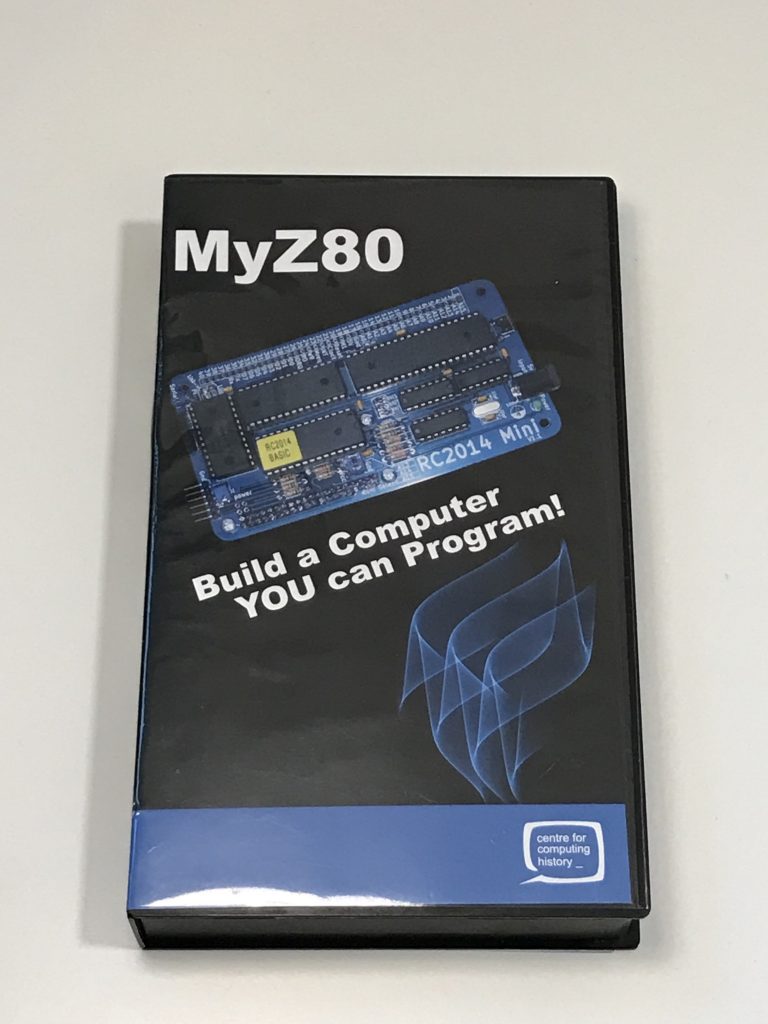
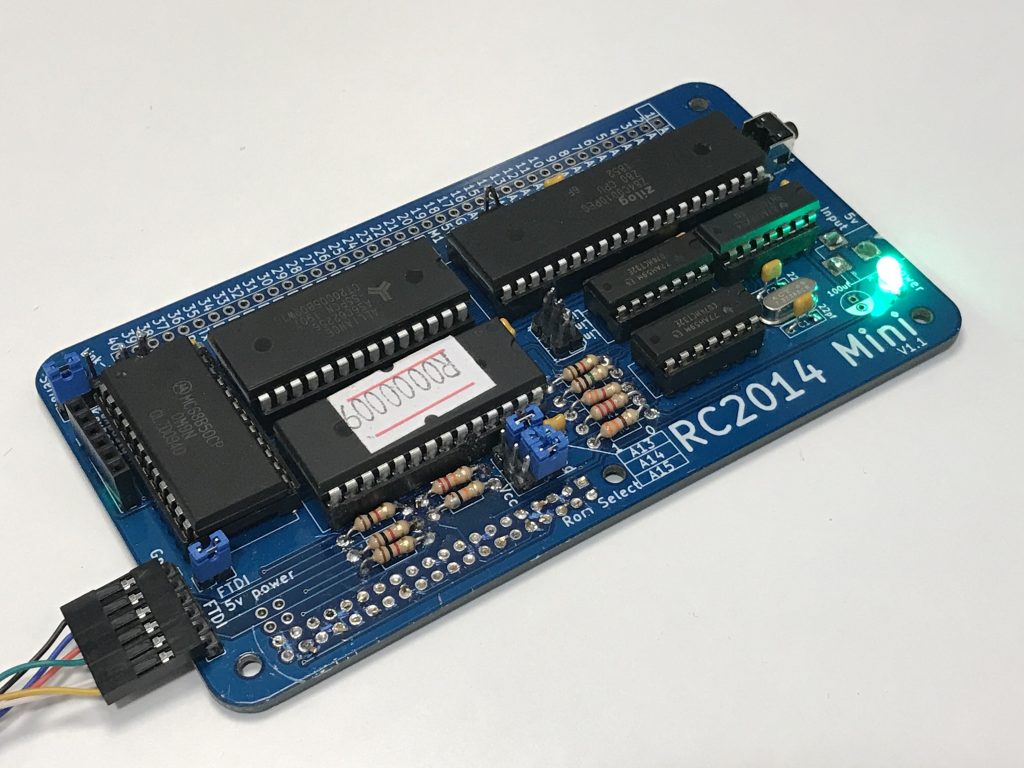
While at the museum I purchased a couple of items from their store, but one item I really wanted was the MyZ80 computer kit but unfortunately it was out of stock. But I was assured by the team that these would be back in stock so I was happy to wait until I got back home and to place an order.
Fast forward six months, the world went into lock down and I thought that this would be a good time to grab the MyZ80 kit and to build my very own computer with BASIC on a ROM.
The kit came with all the components that would be needed to build a Z80 computer that ran NASCOM 1979 BASIC (Microsoft 80 BASIC) and a serial connection cable to talk to it from my Mac.
The kit took about an hour to build, and after some minor troubleshooting (poor solder join) the Z80 was plugged into the serial connector and started.
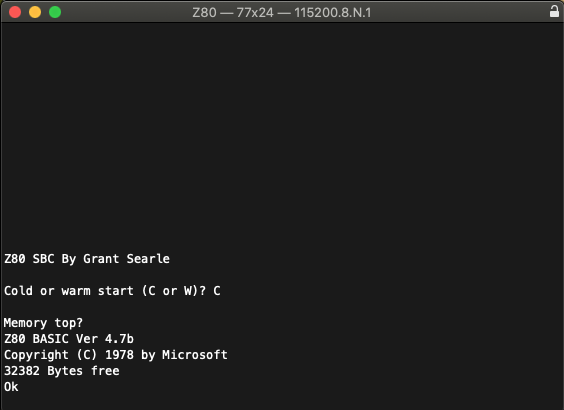
After powering on the Z80 and pressing the reset switch the computer was up and running, prompting me for a Cold or Warm start (cold = clear memory, Warm = keep BASIC code in memory) and then entering through the Memory top.
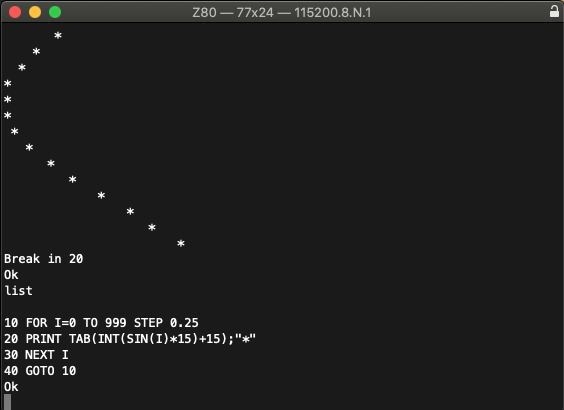
Now the Z80 (RC2014 mini) doesn’t come with any storage device so you either have to type in a BASIC program character by character in the terminal window or for the purpose of testing I opted for copy and paste from some examples in the manual.
So what can you do with a computer that behaves like it from 1979? Well the primary goal is to have fun, just like we all did in 1979. By programming in BASIC, creating entertaining little games and sharing the content with everyone.